Getting Started
Pulp Image provides two ways to use the graphical interface:
Option 1: Portable UI (Recommended)
Option 2: Browser UI via CLI
pulp ui in your terminal to start a local web server. Then open http://localhost:3000 in your browser.
ℹ️ Everything Happens Locally
Interface Overview
The interface is divided into three main areas:
| Area | Purpose |
|---|---|
| Input Source | Select the images you want to process. You can select individual files or entire folders. |
| Processing Options | Configure format, dimensions, quality, and other settings. |
| Results | After processing, see detailed stats for each file including bytes saved. |
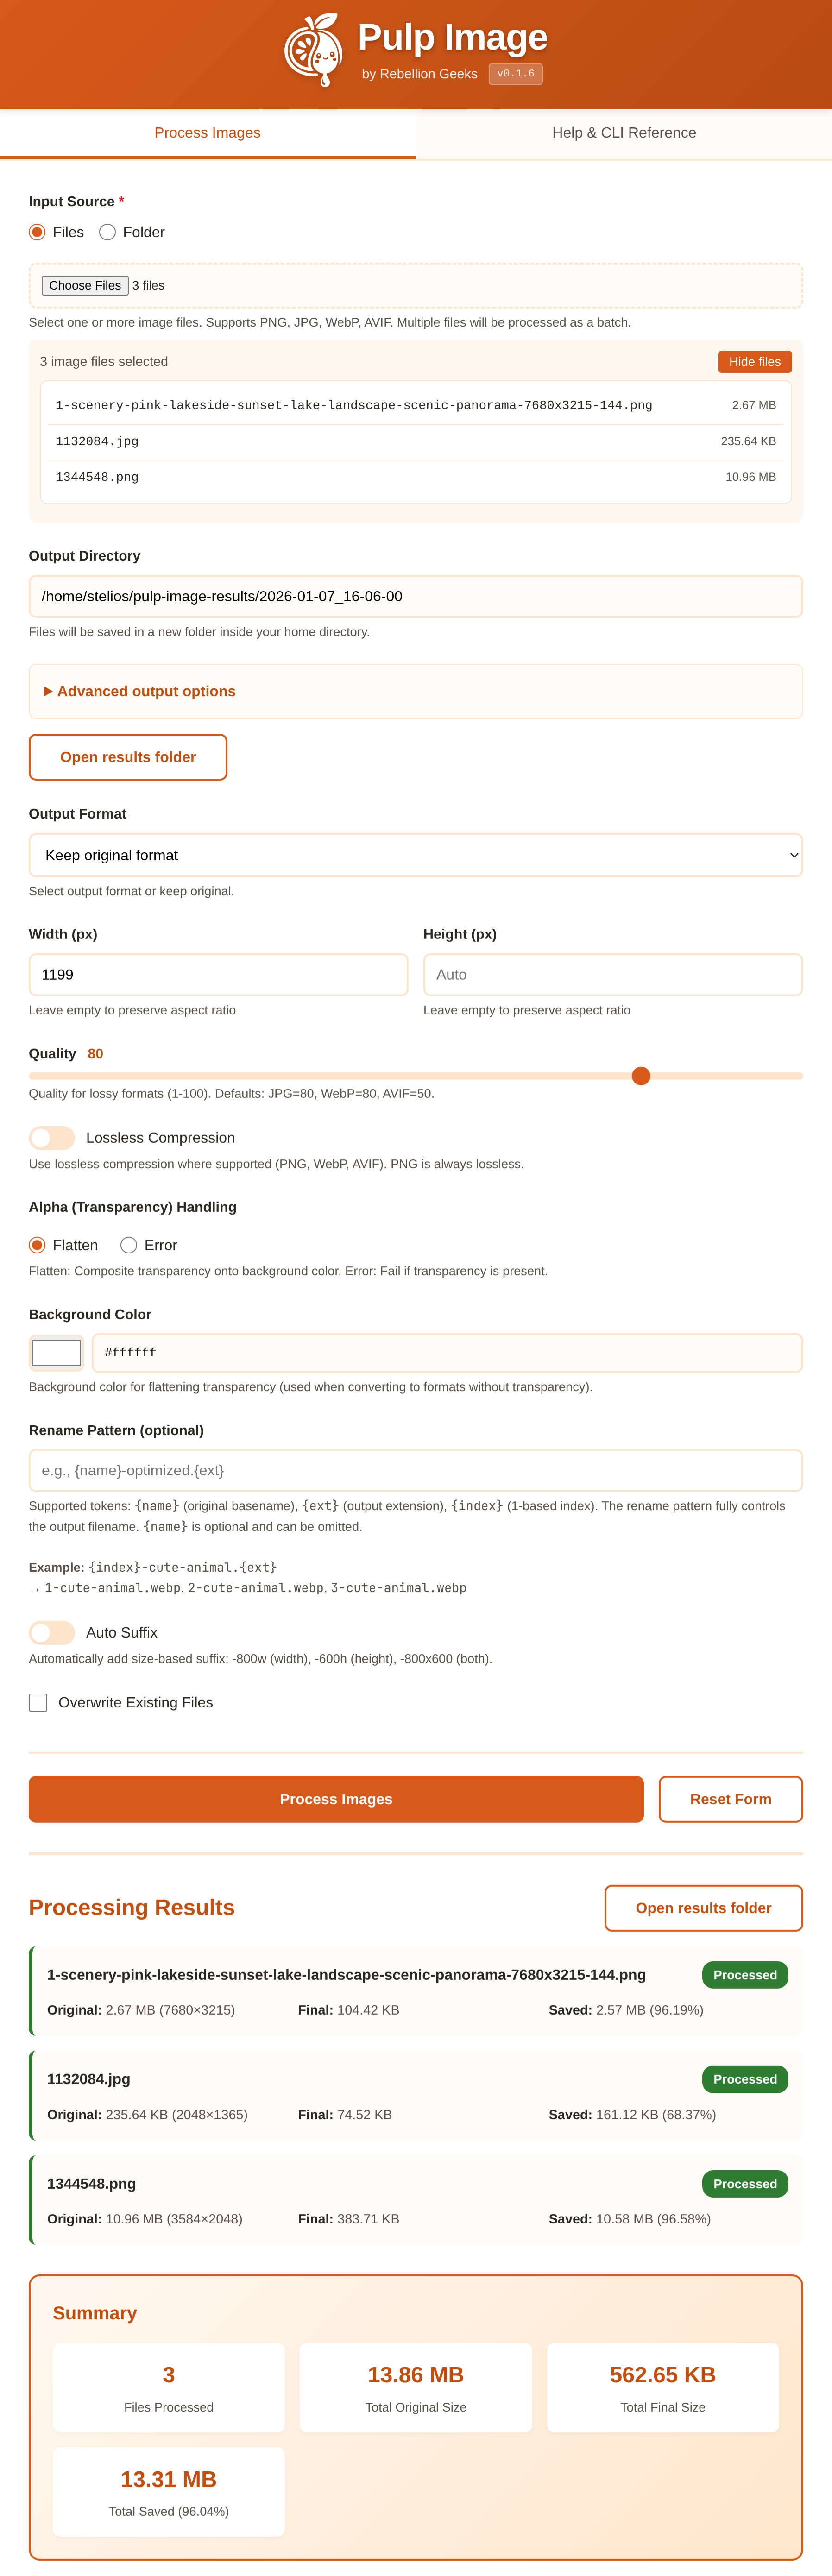
Selecting Images
Files Mode
Select one or more individual image files. Supports:
- PNG, JPG/JPEG, WebP, and AVIF formats
- Multiple file selection (hold Ctrl/Cmd to select multiple)
- Drag and drop from your file manager
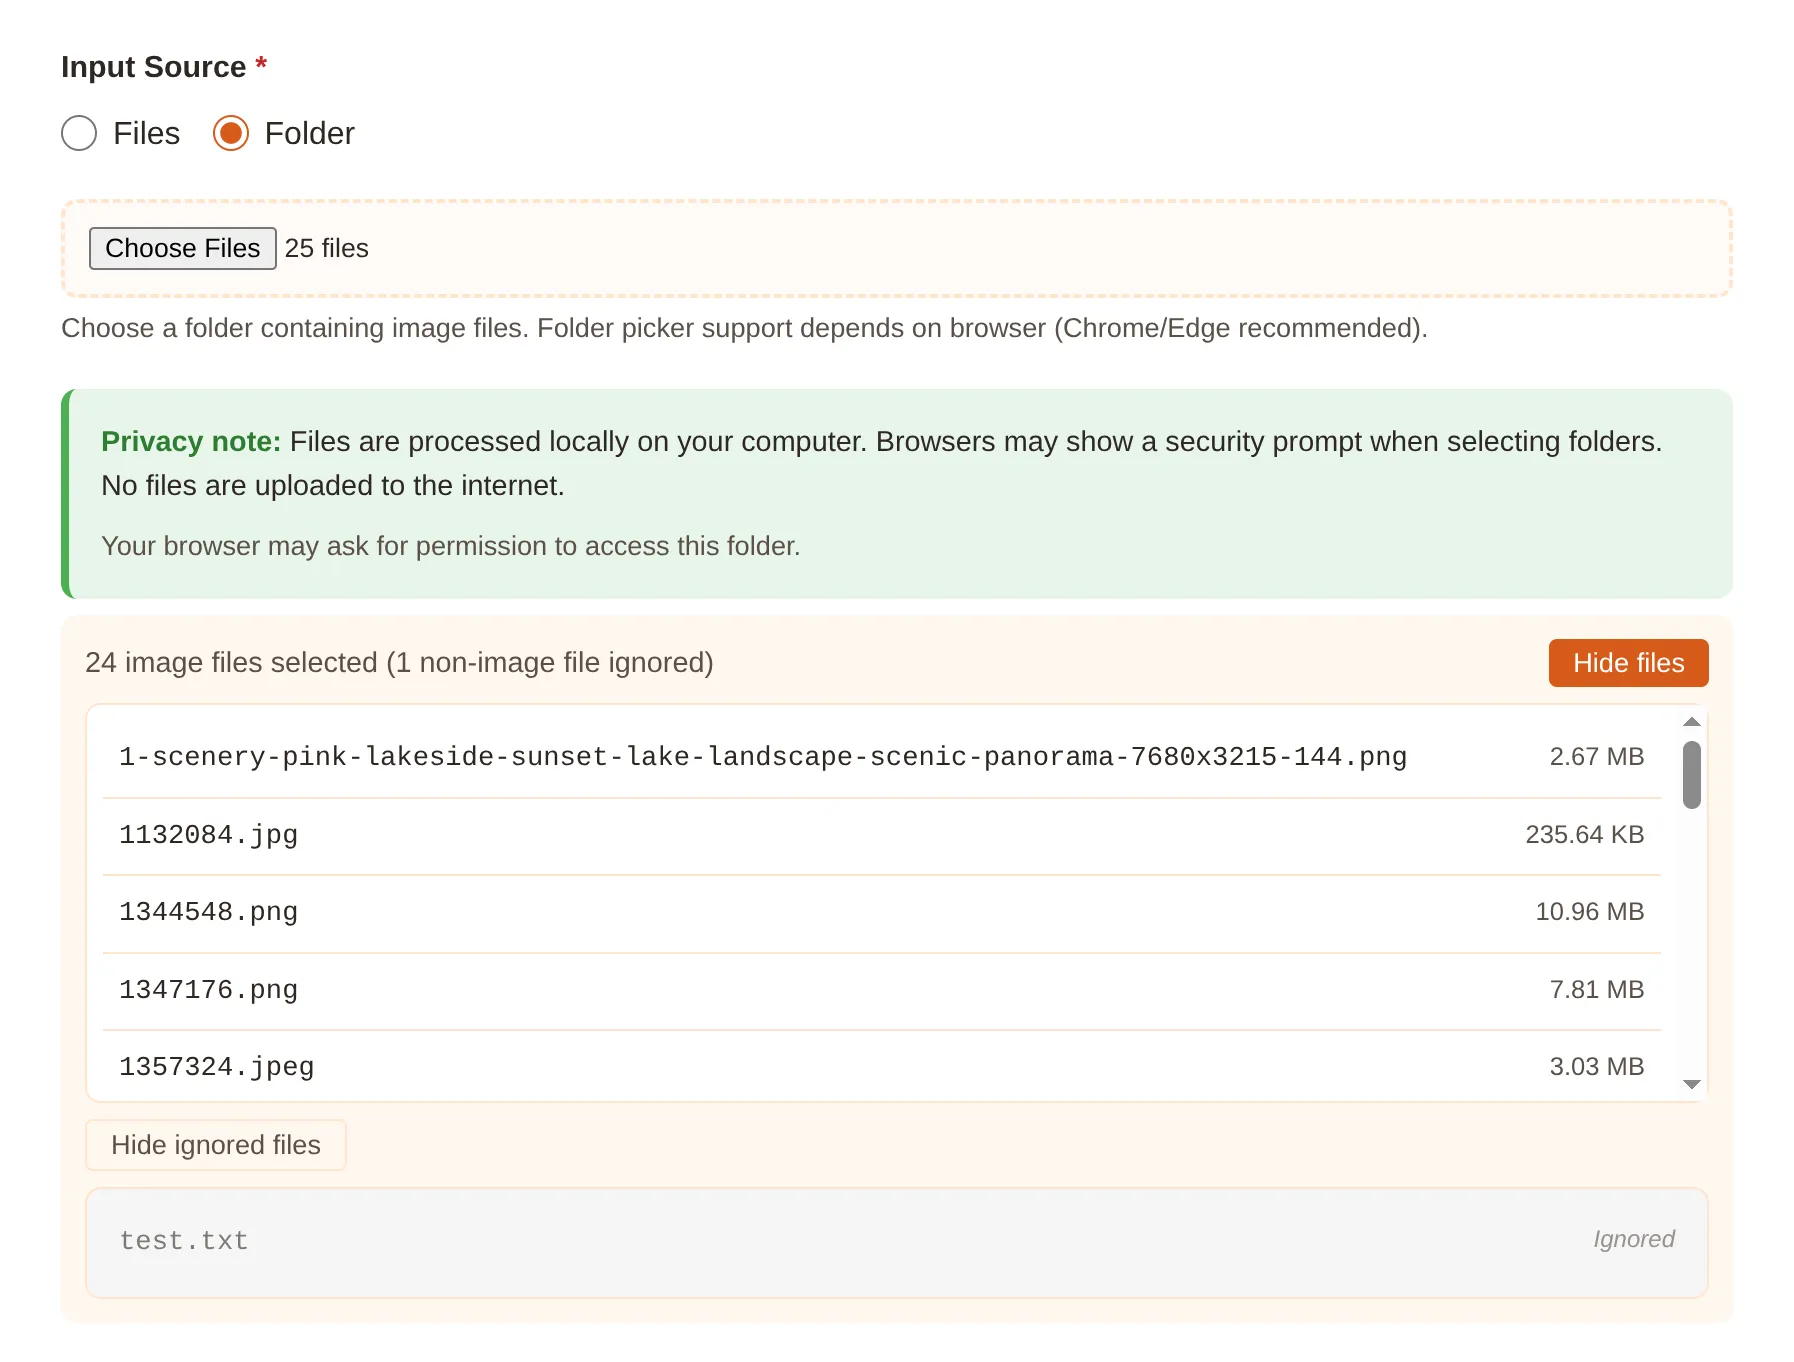
Folder Mode
Select an entire folder to process all images inside. Pulp will automatically find all supported image files and ignore non-image files.
Browser Permission
File List Preview
After selecting files, you'll see a summary showing how many image files were found. Click "Show files" to see the complete list with file sizes. Non-image files are automatically ignored but you can view them by clicking "Show ignored files".
Output Directory
By default, processed images are saved to a timestamped folder in your home directory:
~/pulp-image-results/2026-01-07_14-30-45/
Why a New Folder Each Time?
Custom Output Directory
To use a custom location, expand "Advanced output options" and enable "Use custom output directory". You can then type any path. Use ~ for your home directory.
Open Results Folder
After processing, click "Open results folder" to quickly navigate to your processed images in your file manager.
Output Format
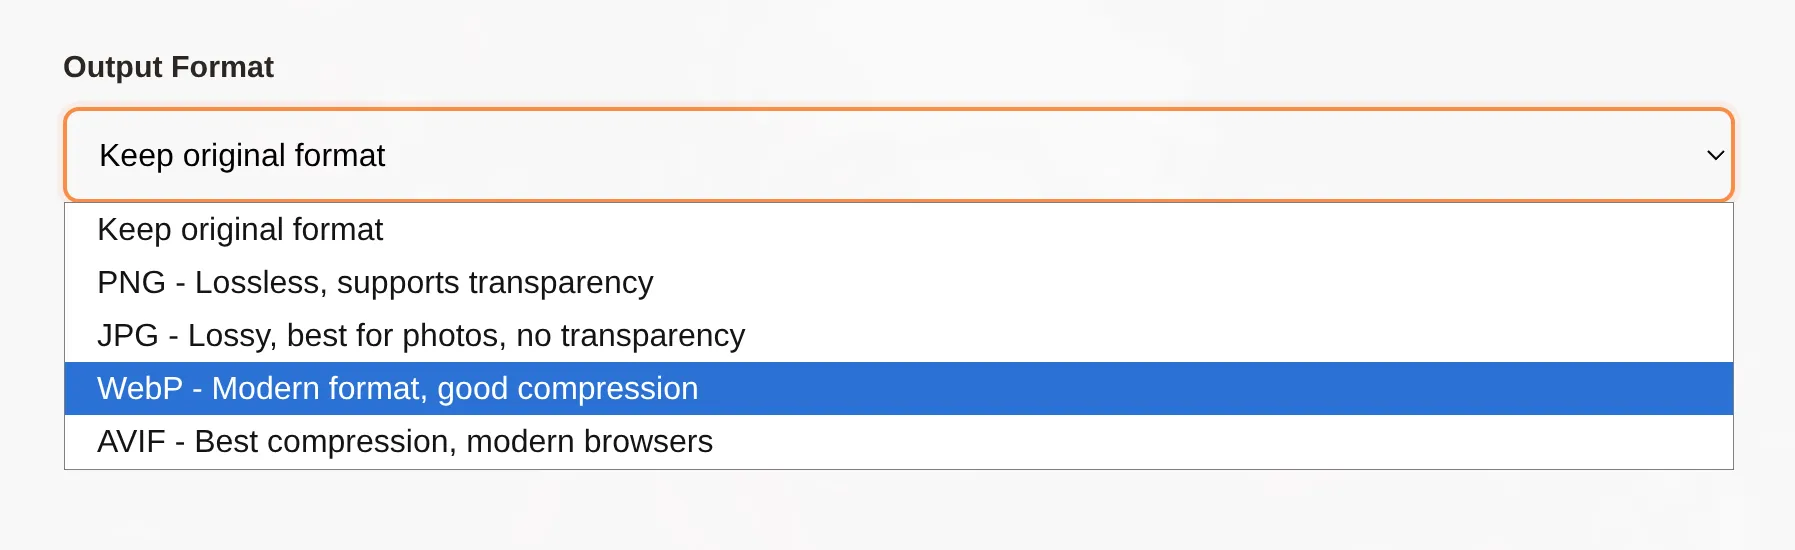
Choose the output format from the dropdown. Each format has different properties:
| Format | Best For | Notes |
|---|---|---|
| Keep original | Resizing without changing format | Only applies resizing and quality changes |
| PNG | Graphics, logos, screenshots | Lossless, supports transparency |
| JPG | Photos, images without transparency | Lossy compression, no transparency |
| WebP | Web images, modern apps | Great compression, supports transparency |
| AVIF | Maximum compression | Best compression, modern browsers only |
Dimensions (Width & Height)

Resize images by specifying width, height, or both in pixels.
| Setting | Result |
|---|---|
| Width only | Resizes to specified width, height adjusts automatically to preserve aspect ratio |
| Height only | Resizes to specified height, width adjusts automatically to preserve aspect ratio |
| Both | Resizes to exact dimensions (may crop if aspect ratios differ) |
| Neither | Keeps original dimensions (useful for format/quality changes only) |
Tip: Creating Thumbnails
Quality Slider
The quality slider controls compression for lossy formats (JPG, WebP, AVIF). Higher quality means better-looking images but larger file sizes.
| Quality Range | Use Case |
|---|---|
| 90-100 | Near-lossless, barely noticeable compression. Good for important photos. |
| 75-89 | Good balance of quality and size. Recommended for most uses. |
| 50-74 | Noticeable compression but still usable. Good for thumbnails or previews. |
| Below 50 | Heavy compression. Only for maximum file size reduction. |
When Quality is Disabled
Lossless Compression
When enabled, images are compressed without any quality loss. The file will be smaller than the original but visually identical.
| Format | Lossless Support |
|---|---|
| PNG | Always lossless (toggle has no effect) |
| JPG | Does not support lossless (toggle disabled) |
| WebP | Supports lossless when enabled |
| AVIF | Supports lossless when enabled |
When to Use Lossless
Alpha (Transparency) Handling
When converting images with transparent areas to formats that don't support transparency (JPG), you have two options:
| Mode | Behavior |
|---|---|
| Flatten | Transparent areas are filled with the background color. This is the default and usually what you want. |
| Error | Processing fails if the image has any transparency. Useful if you want to ensure all input images are already opaque. |
Background Color
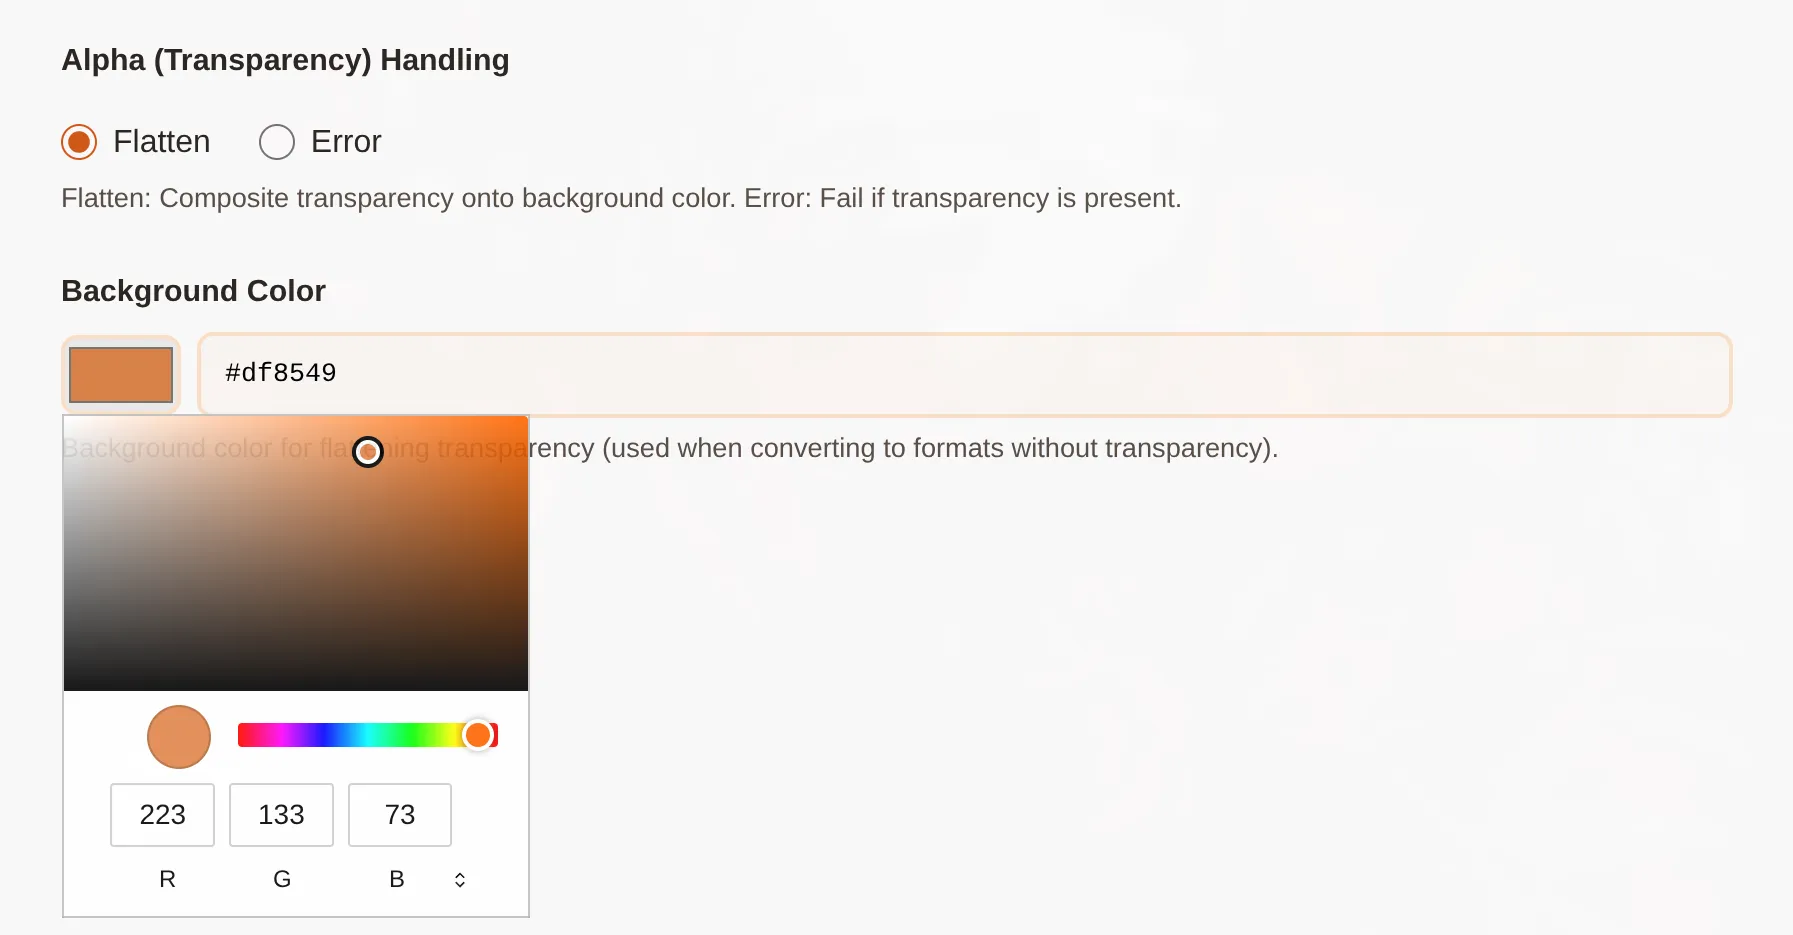
When transparency is flattened, this is the color used to fill transparent areas. Click the color swatch to pick a color visually.
Common Use Cases
- White (#ffffff): Standard for documents and light interfaces
- Black (#000000): Good for dark mode interfaces
- Brand color: Match your website or app background
Rename Pattern
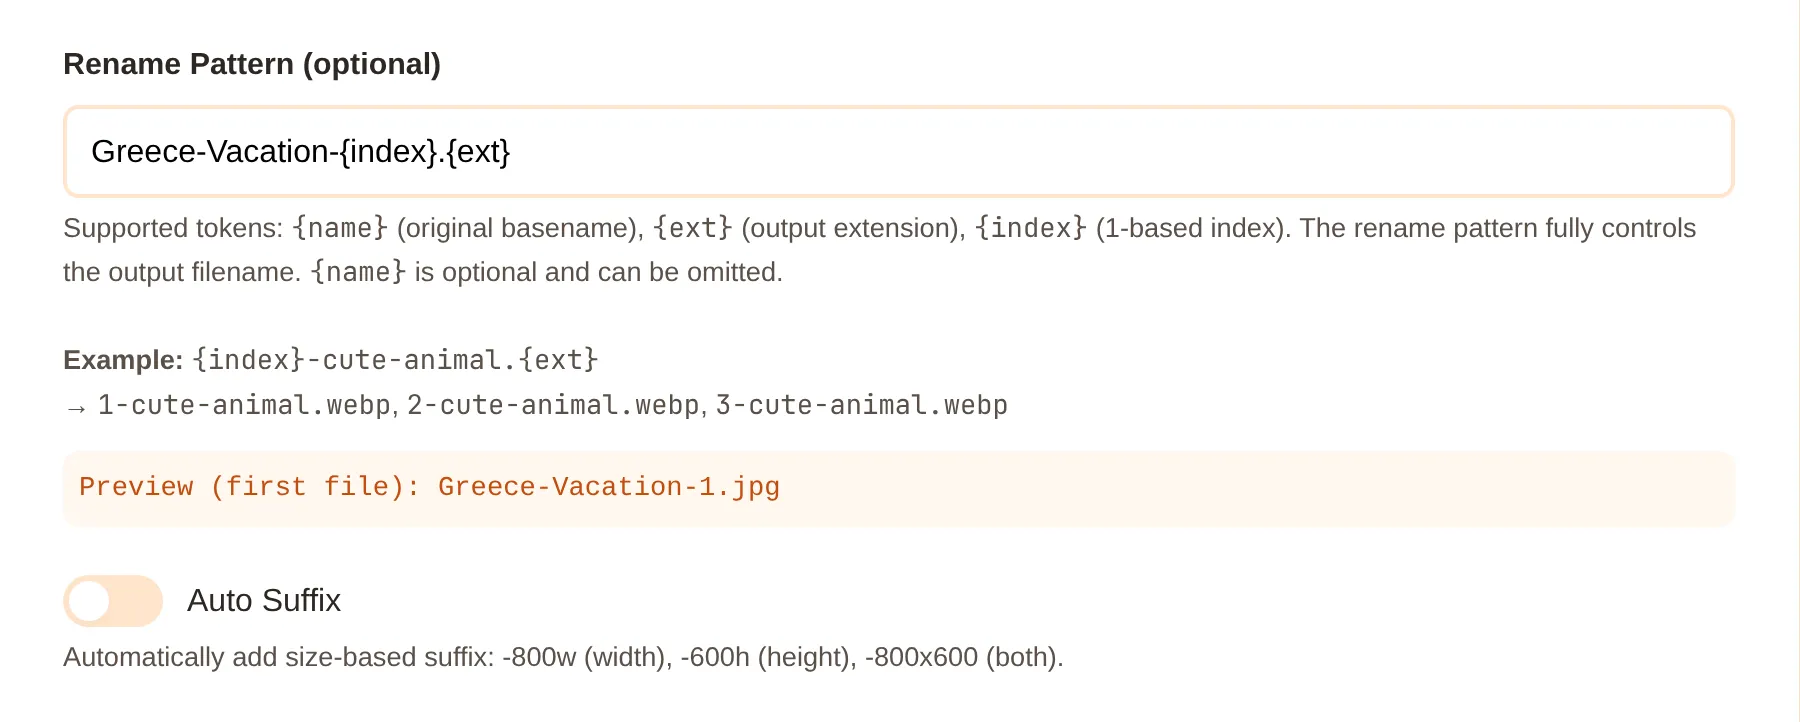
Use a rename pattern to customize output filenames. The pattern uses tokens that are replaced with actual values:
| Token | Replaced With |
|---|---|
{name} |
Original filename (without extension) |
{ext} |
Output file extension (e.g., webp, jpg) |
{index} |
Sequential number starting from 1 |
Examples
| Pattern | Input | Output |
|---|---|---|
{name}-optimized.{ext} |
photo.png | photo-optimized.webp |
{index}-{name}.{ext} |
cat.png, dog.png | 1-cat.webp, 2-dog.webp |
image-{index}.{ext} |
anything.png | image-1.webp |
thumb-{name}.{ext} |
banner.jpg | thumb-banner.webp |
Auto Suffix
When enabled, automatically adds the output dimensions to the filename. This is useful when creating multiple sizes of the same image.
| Dimension Settings | Suffix Added | Example Output |
|---|---|---|
| Width only (800) | -800w |
photo-800w.webp |
| Height only (600) | -600h |
photo-600h.webp |
| Both (800 × 600) | -800x600 |
photo-800x600.webp |
Note: If using a rename pattern, add dimensions directly in the pattern (auto suffix won't apply).
Overwrite Existing Files
By default, if an output file already exists, it will be skipped. Enable this option to replace existing files.
⚠️ Warning
Processing Results
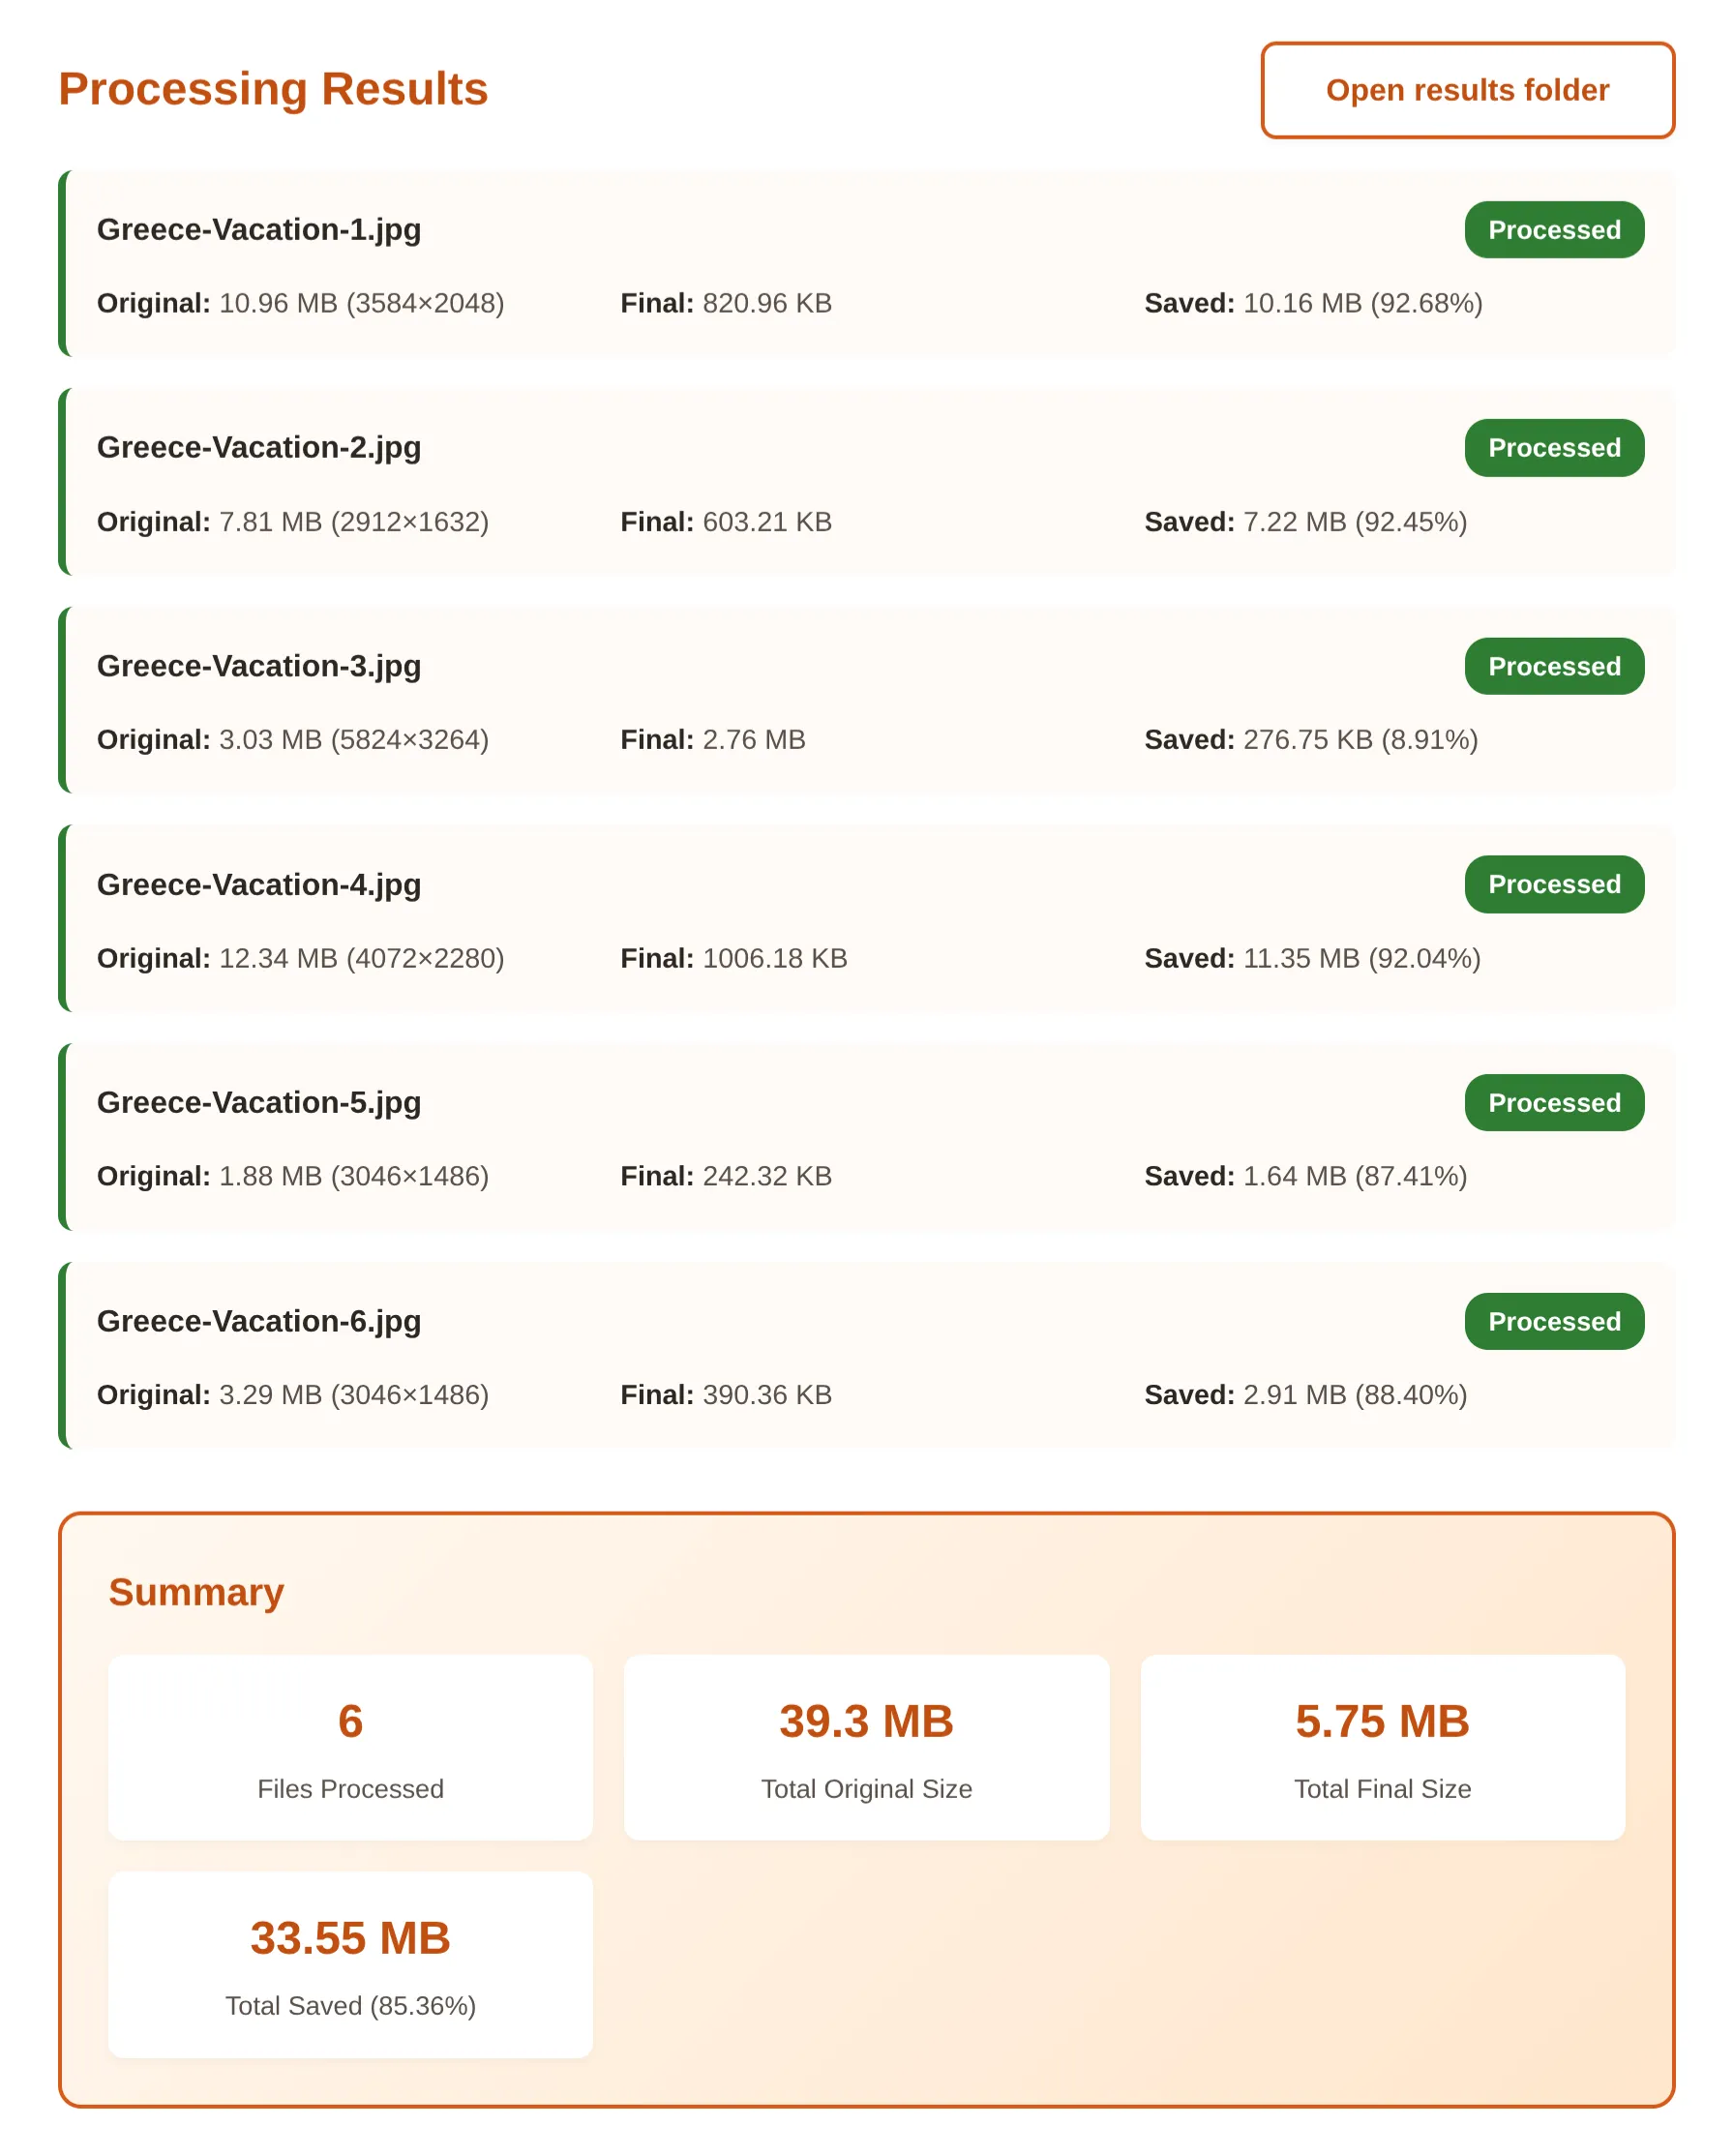
After processing, you'll see results for each file:
| Field | Description |
|---|---|
| Original | Original file size and dimensions (e.g., "4.2 MB (3000×2000)") |
| Final | Output file size after processing |
| Saved | Bytes saved and percentage reduction (e.g., "3.3 MB (79%)") |
Result Types
| Status | Meaning |
|---|---|
| ✓ Processed | File was successfully processed and saved |
| ⚠ Skipped | File was skipped (e.g., output already exists) |
| ✗ Failed | An error occurred processing this file |
UI vs CLI: When to Use Which
Both the UI and CLI can do the same image processing. Here's when to choose each:
| Use UI When... | Use CLI When... |
|---|---|
| You're new to Pulp Image | You're comfortable with the terminal |
| You want visual feedback | You need to automate processing |
| You're processing occasional batches | You're integrating into scripts or CI/CD |
| You want to see options and previews | You need the --delete-original option |
Delete Original Files
--delete-original flag.